note: This is an involved recipe that requires advance prep work.
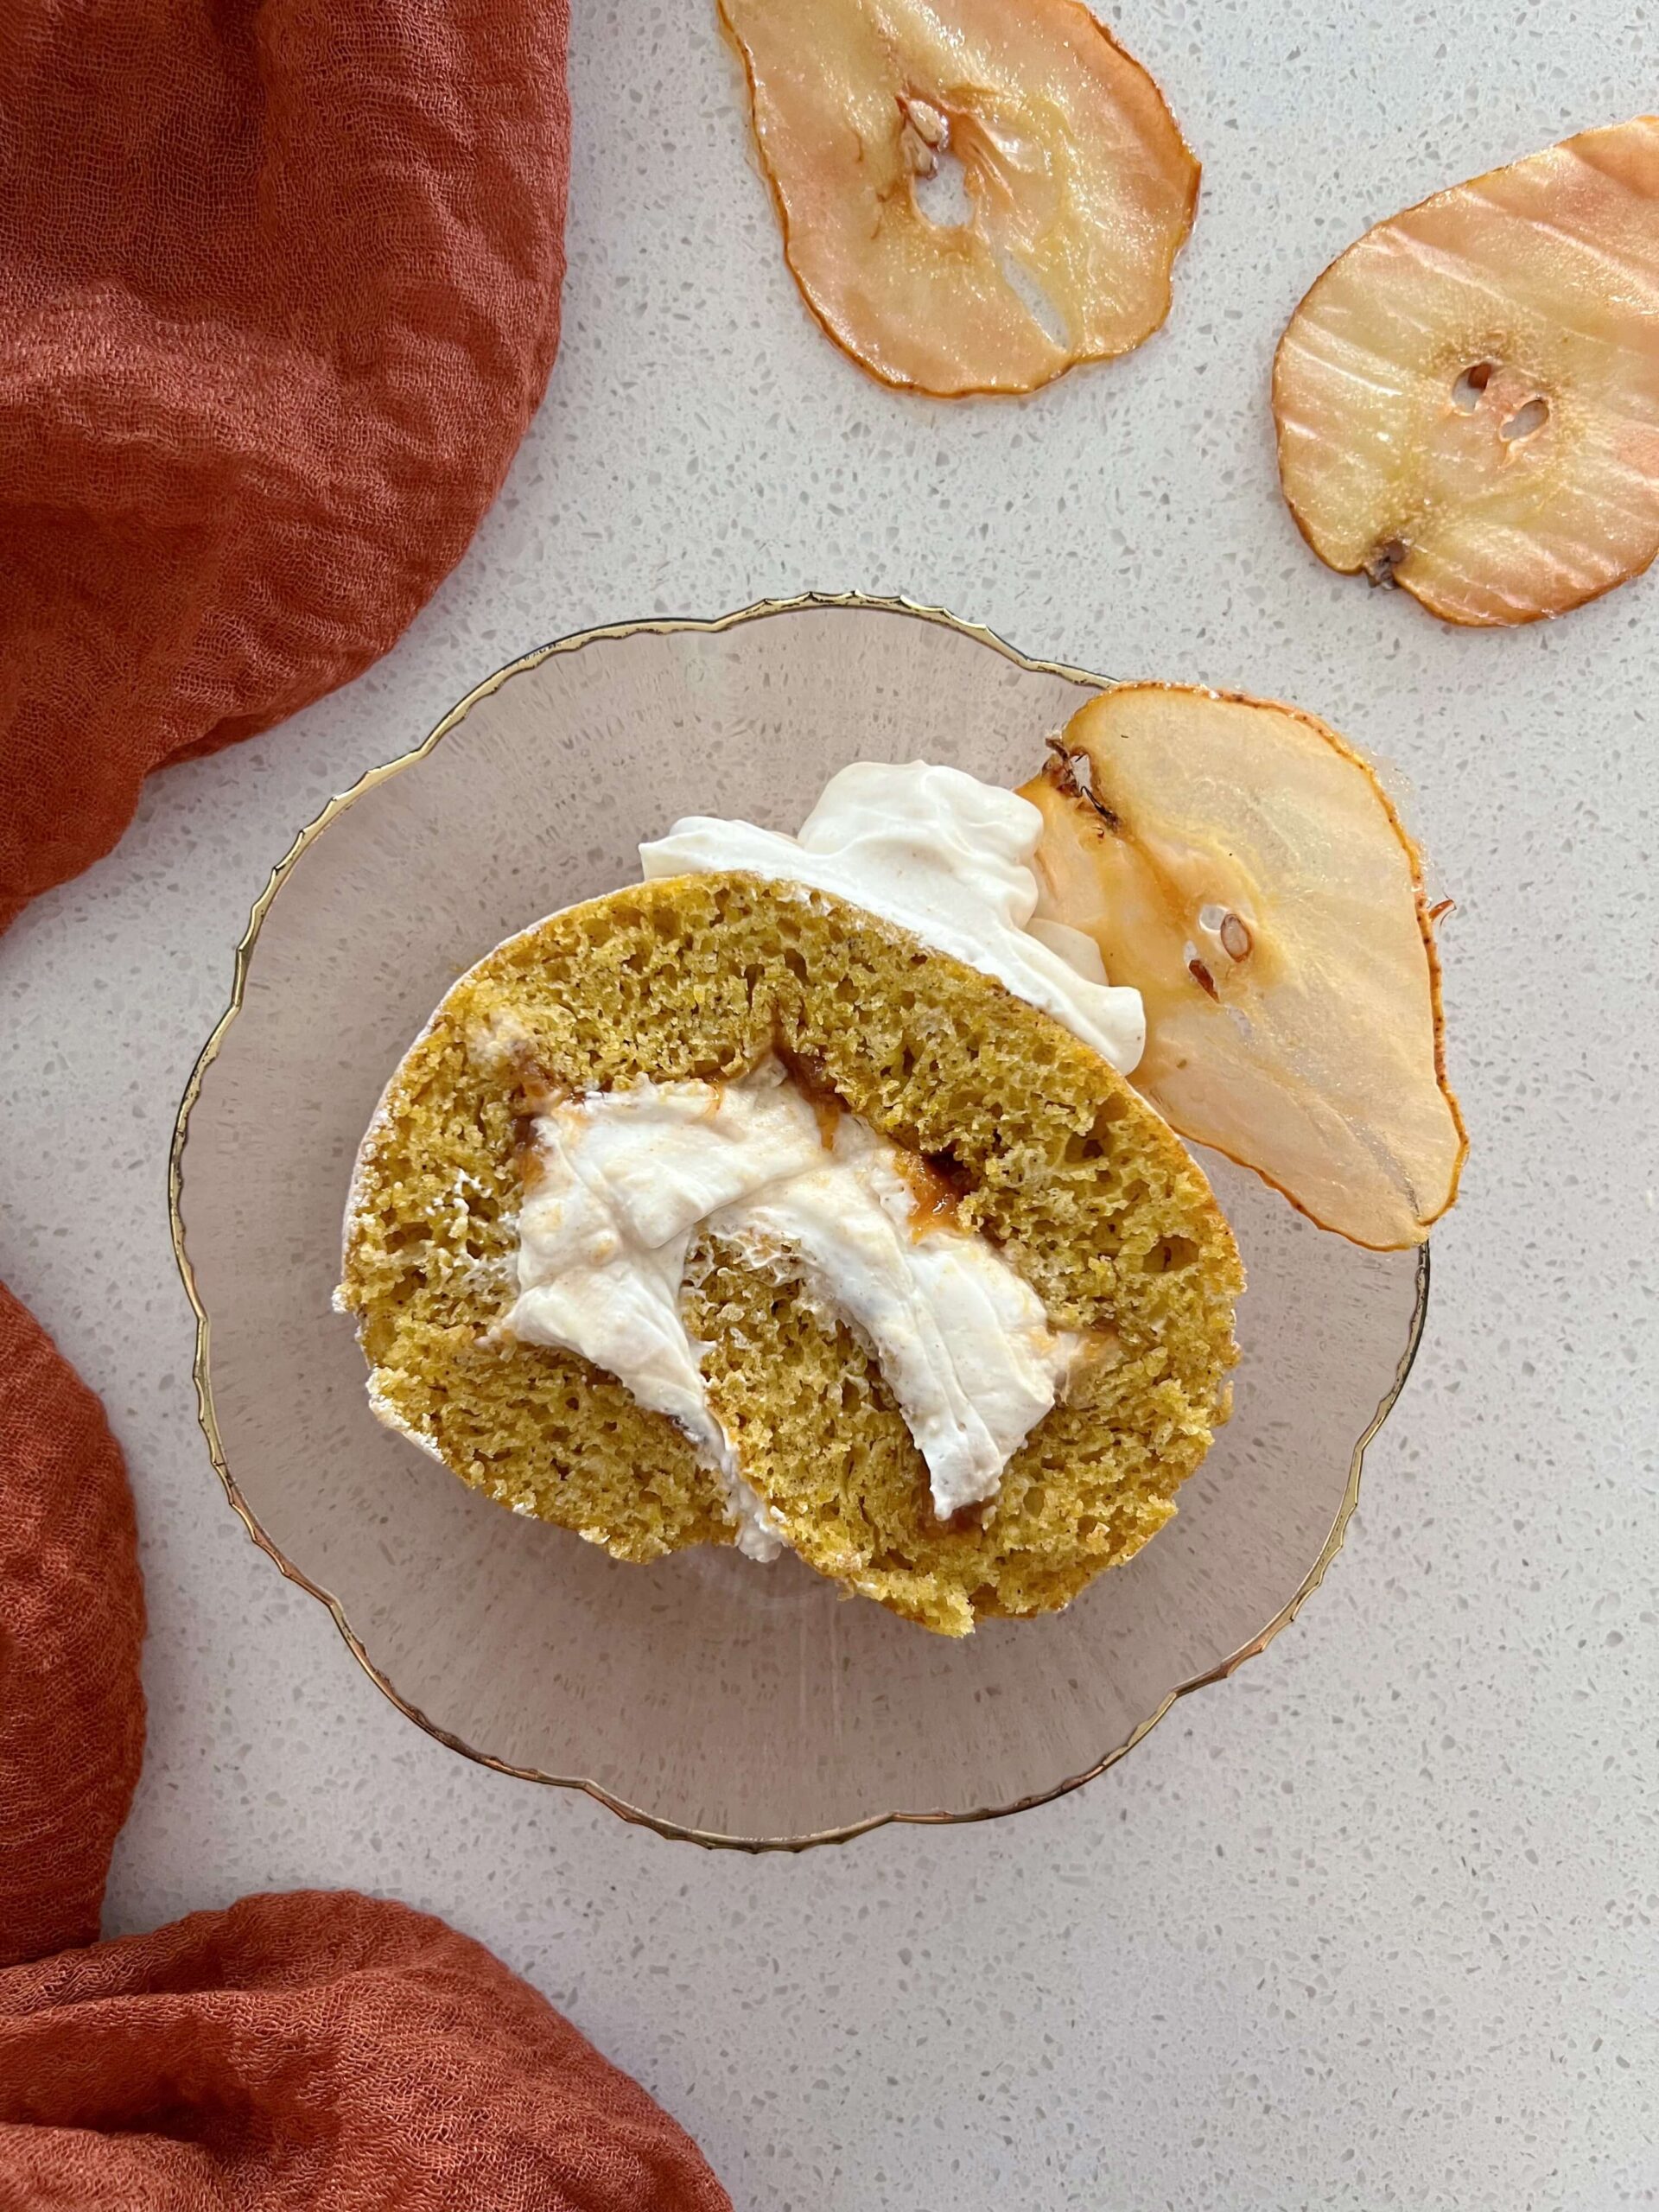
Indulge in the delightful flavors of fall with this Kabocha Squash Swiss Roll, filled with a tart & sweet apple-pear jam and nutty & airy kinako whipped cream, and decorated with crunchy candied pear crisps. 🍁
I created this delicious treat for a Friendsgiving potluck. One of my favorite thing about Thanksgiving is that it makes for a great excuse to gather folks and make extravagant food and eat good food together 🥰. The cake was an absolute hit! I am my toughest critic when it comes to food I make, so it is a great feeling to get such amazing feedback. I’m excited to share this recipe with you so you can try this amazing flavor and texture combination too!

About the flavors:
- Kabocha Squash: The kabocha squash adds a rich, earthy sweetness to a swiss roll, with a creamy, nutty flavor that complements the light texture of the cake. Its subtle complexity that adds a depth with overpowering.
- Apple-Pear Jam: The jam added a fruity sweetness, enhancing the squash’s natural flavor while adding complexity.
- Kinako Cream: The nutty, creamy texture of the kinako balanced the sweetness of the jam and added depth to each bite.
- Candied Pear Slices: These slices acted as a beautiful visual element, adding sophistication and a touch of couture to the presentation. They likely enhanced the flavor profile with their caramelized sweetness and texture.

The process
Everything in this swiss roll is made from scratch, and I think that is why it is so good! But, as a result, a lot of prepping is involved in advance! So if you are looking for a quick and simple recipe, save this for next time when you have enough time to prep! The suggested amount of time to make this recipe is 2 days.
Sample baking schedule:
- Morning: Bake the sponge
- Afternoon: Fill the sponge & chill
- Evening (or next day): Decorate and serve the Swiss roll
Day 1:
Prepare the mashed kabocha squash
We need to make kabocha squash purée for the Swiss roll sponge. You can make the purée using two methods: baking & steaming. I recommend baking since roasting the kabocha squash helps bring out more of its flavors however, the steaming method works well too.
- Prepare the squash: Cut the kabocha squash in half. You will only need half for this recipe. Use a spoon to scoop out the seeds and any stringy flesh from the center. You are ready now to bake or steam the squash
- Cooking the squash:
- Baking/Roasting Method: Preheat your oven to 400°F (200°C). Drizzle the cut half of the kabocha squash with olive oil. Lightly season with salt and sprinkle with ground cinnamon. Place the seasoned squash cut-side down on a prepared baking sheet lined with a baking mat, parchment paper, or aluminum foil. Bake in the preheated oven for 30-35 minutes, or until the squash is fork-tender and lightly browned in places.
- Steaming Method: Prepare a steam basket over a pot of water on the stovetop.Line the steam basket with a cotton cloth or a silicone steamer liner.Place the cut half of the kabocha squash down in the steam basket.Cover the pot and bring the water to a boil over high heat.Once boiling, reduce the heat to medium and allow the squash to steam for about 30 minutes, or until fork-tender.
- Allow the cooked kabocha squash to cool until it’s manageable to handle. Using a spoon, scoop out the flesh and transfer it to an airtight container. Mash the kabocha squash into a smooth paste—while you can use a food processor or blender for this, it should be soft enough to mash easily with a spoon. Once mashed, cover the container and let the squash cool completely. Store it in the fridge until you’re ready to use it.

Prepare the Apple-Pear Jam:
- Peel one apple and one pear, then dice them into small, even pieces. Add the diced fruit to a medium-sized saucepan.
- Place the saucepan over medium heat. Cook the fruit, stirring frequently, until it becomes soft and fragrant, about 10-15 minutes. Once the fruits are softened, gently mash them. Make sure to leave some pieces whole– we want it to be chunky.
- Stir in 60g sugar, 1/3 tsp ground cinnamon, and a pinch of nutmeg, allspice and salt. Mix well to combine all the ingredients. Continue stirring constantly until the sugar has completely dissolved into the fruit mixture. Continue to cook and stir until the jam has become a thick jam like consistency.
- Taste the jam to check its flavor; it should have a nice balance of tartness and sweetness. If you find the jam too tart for your liking, you can add more sugar to sweeten it. Keep in mind that this jam should not be as sweet as typical jellies or fruit preserves. If you feel the jam is lacking tartness (this often is the case if you used a sweeter apple variety) try adding a little more lemon juice to add acidity.
- Once the jam has thickened, remove the saucepan from heat. Carefully transfer the jam to a container. Loosely cover the container with a lid and allow the jam to cool to room temperature. Once completely cooled, tighten the lid and refrigerate the jam until you are ready to use it.

Prepare the Candied Pear Crisps
- Preheat the oven to 300F. Prepare a baking sheet with a silicone baking mat or parchment paper.
- Using a mandoline slicer, carefully slice the pear into thin, even pieces.
- Sprinkle a generous layer of sugar onto a plate and place a slice of pear on top. Sprinkle more sugar over the pear slice and gently press the sugar into the fruit to help it adhere. Carefully transfer the coated pear slice to a baking sheet and repeat the process with the remaining pear slices until all are coated.
- Bake the pears for approximately 12 minutes, or until they appear dehydrated and begin to take on a golden color. Keep a close eye on the pears during the last half of the baking time, as they can easily burn once they start to dehydrate.
- Allow the candied pear crisps to cool completely. Once cooled, store them in an airtight container, placing parchment paper between each crisp to prevent them from sticking together until you are ready to use them.

Day 2
Make the Kabocha Squash Sponge
- Preheat your oven to 375°F. Line a jelly-roll pan with parchment paper, ensuring the paper extends slightly over the edges for easy removal.
- In a medium bowl, sift together 90g all-purpose flour, 1 tsp baking powder, 1/2 tsp baking soda, 1/4 tsp salt, 1 tsp ground cinnamon, 1/4 tsp ground ginger, 1/4 tsp ground nutmeg, 1/8 tsp ground allspice and 1/8 tsp ground cloves. Set aside.
- In a large bowl, use a handheld electric or stand mixer to beat 3 eggs with 150g sugar until the mixture becomes thick and pale yellow in color. Then, fold in the kabocha squash purée (that was made in advance) into the egg and sugar mixture until well combined. Then, fold in the dry ingredients.
- Pour the batter into the prepared jelly roll baking pan and spread it evenly, smoothing the top with a spatula. Gently tap the baking pan on the counter to remove any bubbles.
- Bake the sponge for 12 minutes, or until a toothpick inserted in the center comes out clean.
- While the cake is baking, sift kinako (soybean flour) onto a thin kitchen/tea towel. Ensure that the surface is just bigger than the cake and that the kinako is spread in a light, even layer. Next, sprinkle powdered sugar over the kinako. This combination will help prevent the cake from sticking when it is rolled.
- While the cake is still hot, invert the cake onto the prepared towel and carefully peeling off the parchment paper. Starting from the short end, roll the cake up with the towel, creating a log shape. Place the rolled cake, seam side down, on a wire rack and let it cool completely.

Fill the Swiss Roll & Chill
- Combine the 180g heavy cream, 30g powdered sugar, and 30g kinako in a mixing bowl. Using an electric mixer, whip the mixture on high speed until stiff peaks form. Taste the cream. If you want the cream to be sweeter and/or more nutty, you can incorporate more powdered sugar and/or kinako.
- Once the cake has cooled, carefully unroll it. Thinly spread the apple-pear jam over the surface, followed by an even layer of the whipped cream mixture, leaving a 1-inch border around the edges. Carefully roll the cake back up, tightly, without the towel. Transfer the rolled cake to a serving platter and refrigerate for at least 1 hour to set.

Decorate & Serve
- Transfer the remaining kinako whipped cream to a piping bag fitted with your desired piping tip. Secure the open end by tying it closed, and store the piping bag in the refrigerator until ready to use.
- After the cake has set and is ready to be served, pipe the whipped cream along the top. Finish by garnishing with candied pear crisps for an elegant touch.Alternatively, if you prefer to pre-slice the cake, you can arrange the candied pear crisps on the side of each slice on the plate after cutting.

Looking for more Asian flavor sweet bakes? You might like these:


- Coconut Pandan Tres Leches Cake
- Black Sesame Matcha Tiramisu
- Black Sesame Lady Fingers
- Coconut Pandan Mochi Muffins

Kabocha Squash Swiss Roll with Apple-Pear Jam and Kinako Cream
Equipment
- Parchment Paper
- pipping bag & tips optional
Ingredients
Mashed Kabocha Squash
- 1/2 medium kabocha squash
- olive oil optional
- salt optional
- ground cinnamon optional
Apple-Pear Jam
- 1 Granny Smith Apple
- 1 Bosc or Anjou Pear
- 60 g cane sugar
- 2 tbsp lemon
- 1/3 tsp ground cinnamon
- pinch ground all spice
- pinch ground nutmeg
- pinch salt
Candied Pear Crisps (optional, for decoration)
- 1 Bosc or Anjou Pear
- cane sugar
Kabocha Squash Sponge
- 90 g all purpose flour
- 1 tsp baking powder
- 1/2 tsp baking soda
- 1/4 tsp salt
- 1 tsp ground cinnamon
- 1/4 tsp ground ginger
- 1/4 tsp ground nutmeg
- 1/8 tsp ground all spice
- 1/8 tsp groud cloves
- 3 eggs
- 150 g cane sugar
- 180 g mashed kabocha squash
- kinako (soybean flour) for rolling
- powdered sugar for rolling
Kinako Whipped Cream
- 180 g heavy cream
- 30 g powdered sugar
- 40 g kinako powder
Instructions
Make the kabocha squash purée
- You can prepare the kabocha squash puree by either roasting or steaming the squash. Roasting enhances the nutty flavors, while steaming is a quicker method. Here are instructions for both methods:
- First, prepare the Squash: Cut the kabocha squash in half. You will only need half for this recipe.Use a spoon to scoop out the seeds and any stringy flesh from the center.
- Roasting Method:Preheat your oven to 400°F (200°C). Drizzle the cut half of the kabocha squash with olive oil. Lightly season with salt and sprinkle with ground cinnamon. Place the seasoned squash cut-side down on a prepared baking sheet lined with a baking mat, parchment paper, or aluminum foil. Bake in the preheated oven for 30-35 minutes, or until the squash is fork-tender and lightly browned in places.

- Steaming Method:Prepare a steam basket over a pot of water on the stovetop.Line the steam basket with a cotton cloth or a silicone steamer liner.Place the cut half of the kabocha squash down in the steam basket.Cover the pot and bring the water to a boil over high heat. Once boiling, reduce the heat to medium and allow the squash to steam for about 30 minutes, or until fork-tender.
- Allow the cooked kabocha squash to cool until it's manageable to handle. Using a spoon, scoop out the flesh and transfer it to an airtight container. Mash the kabocha squash into a smooth paste—while you can use a food processor or blender for this, it should be soft enough to mash easily with a spoon. Once mashed, cover the container and let the squash cool completely. Store it in the fridge until you’re ready to use it.
Make the apple-pear jam
- Peel the apple and pear, then dice them into small, even pieces. Add the diced fruit to a medium-sized saucepan.
- Place the saucepan over medium heat. Cook the fruit, stirring frequently, until it becomes soft and fragrant, about 10-15 minutes. Once the fruits are softened, gently mash them. Make sure to leave some pieces whole– we want it to be a bit chunky.
- Stir in the sugar, ground cinnamon, nutmeg, allspice, and salt. Mix well to combine all the ingredients. Continue stirring constantly until the sugar has completely dissolved into the fruit mixture. Continue to cook and stir until the jam has become a thick jam like consistency.
- Taste the jam to check its flavor; it should have a nice balance of tartness and sweetness. If you find the jam too tart for your liking, you can add more sugar to sweeten it. Keep in mind that this jam should not be as sweet as typical jellies or fruit preserves. If you feel the jam is lacking tartness (this often is the case if you used a sweeter apple variety) try adding a little more lemon juice to add acidity.
- Once the jam has thickened, remove the saucepan from heat. Carefully transfer the jam to a container. Loosely cover the container with a lid and allow the jam to cool to room temperature. Once completely cooled, tighten the lid and refrigerate the jam until you are ready to use it.

Make the candied pear crisps
- Preheat the oven to 300F. Prepare a baking sheet with a silicone baking mat or parchment paper.
- Using a mandoline slicer, carefully slice the pear into thin, even pieces.
- Sprinkle a generous layer of sugar onto a plate and place a slice of pear on top. Sprinkle more sugar over the pear slice and gently press the sugar into the fruit to help it adhere. Carefully transfer the coated pear slice to a baking sheet and repeat the process with the remaining pear slices until all are coated.
- Bake the pears for approximately 12 minutes, or until they appear dehydrated and begin to take on a golden color. Keep a close eye on the pears during the last half of the baking time, as they can easily burn once they start to dehydrate.

- Allow the candied pear crisps to cool completely. Once cooled, store them in an airtight container, placing parchment paper between each crisp to prevent them from sticking together until you are ready to use them.
Make the kabocha squash sponge
- Preheat your oven to 375°F. Line a jelly-roll pan with parchment paper, ensuring the paper extends slightly over the edges for easy removal.
- In a medium bowl, sift together the all-purpose flour, spices, baking powder, baking soda, and salt. Set aside.
- In a large bowl, use a handheld electric or stand mixer to beat the eggs with sugar until the mixture becomes thick and pale yellow in color. Then, fold in the kabocha squash purée into the egg and sugar mixture until well combined. Then, fold in the dry ingredients.
- Pour the batter into the prepared jelly-roll pan and spread it evenly, smoothing the top with a spatula. Gently tap the baking pan on the counter to remove any bubbles.
- Bake the sponge for 12 minutes, or until a toothpick inserted in the center comes out clean.

- While the cake is baking, sift kinako onto a thin kitchen/tea towel. Ensure that the surface is just bigger than the cake and that the kinako is spread in a light, even layer. Next, sprinkle powdered sugar over the kinako. This combination will help prevent the cake from sticking when it is rolled.
- While the cake is still hot, invert the cake onto the prepared towel and carefully peeling off the parchment paper. Starting from the short end, roll the cake up with the towel, creating a log shape. Place the rolled cake, seam side down, on a wire rack and let it cool completely.

Make the whipped cream & assemble the cake
- Combine the heavy cream, powdered sugar, and kinako in a mixing bowl. Using an electric mixer, whip the mixture on high speed until stiff peaks form. Taste the cream. If you want the cream to be sweeter and/or more nutty, you can incorporate more powdered sugar and/or kinako.
- Once the cake has cooled, carefully unroll it. Thinly spread the apple-pear jam over the surface, followed by an even layer of the whipped cream mixture, leaving a 1-inch border around the edges. Carefully roll the cake back up, tightly, without the towel. Transfer the rolled cake to a serving platter and refrigerate for at least 1 hour to set.

- Transfer the remaining kinako whipped cream to a piping bag fitted with your desired piping tip. Secure the open end by tying it closed, and store the piping bag in the refrigerator until ready to use.
- After the cake has set and is ready to be served, pipe the whipped cream along the top. Finish by garnishing with candied pear crisps for an elegant touch. Alternatively, if you prefer to pre-slice the cake, you can arrange the candied pear crisps on the side of each slice on the plate after cutting.

